The art of food preservation has long been a valuable skill in our culinary journey, enabling us to extend the shelf life of our favorite food items while maintaining their nutritional value. One such effective method is dehydration, removing moisture to inhibit the growth of bacteria, yeast, and mold. If you’ve been wondering how to dehydrate in the oven, you’re about to explore this age-old technique refined by modern convenience. With years of experience in this area of expertise, I want to share with you practical tips, secrets, and techniques that will turn your kitchen into a center of efficient food storage!
Types of ovens for dehydration

While the core principle of dehydrating food remains the same – the removal of moisture to extend the food’s shelf life – the method you choose can influence the quality of the end product. I’d recommend paying attention to the type of oven because it is a key factor in this process.
| Oven type | Advantages | Limitations |
|---|---|---|
| Regular oven | These ovens are common in most households, making them convenient for occasional dehydrating in the oven. With low-temperature settings and the option to leave the oven door slightly open for air circulation, they can effectively dehydrate food. | Regular ovens often lack precise temperature control below 150°F (65°C), which can result in uneven drying or cooked food rather than dehydration. |
| Convection oven | Convection ovens use a fan to circulate hot air, promoting even heat distribution. This leads to faster and more consistent dehydration, which is especially beneficial for larger batches of food. | Convection ovens can sometimes over-dry food due to the efficient heat circulation. Monitoring is crucial to avoid over-dehydration. They can also be more expensive than regular ovens. |
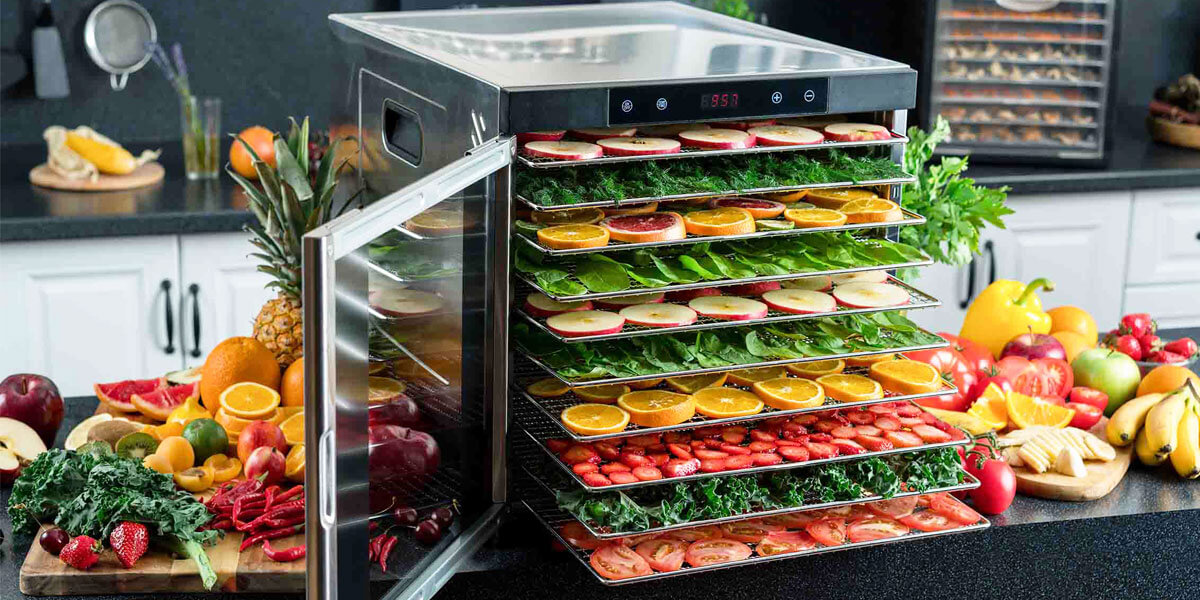
| Oven with a built-in dehydrator | These ovens come with a special feature specifically designed for dehydrating. They offer precise temperature control, often allowing for settings as low as 95°F (35°C), and they maintain consistent airflow for even drying. | While these ovens are the most effective for dehydrating food in the oven, they can be pricey and are not as common in most households. The extra cost may not be worth it if you only plan on dehydrating food occasionally. |
Food suitable for dehydration in the oven
Dehydrating food in the oven extends beyond just fruits and vegetables. Here, I explore different food types suitable for oven dehydration, each with its unique considerations:
- Fruits: Fruits like apples, bananas, pears, and berries are excellent for oven dehydration. They should be thinly sliced for consistent drying. Remember to use a low oven temperature to retain their color and nutritional value.
- Vegetables: Most vegetables, including carrots, potatoes, tomatoes, and peppers, can be dehydrated in the oven effectively. Blanching before dehydration can help maintain color and taste.
- Herbs: Herbs like rosemary, thyme, and basil dry well. Ensure that they are clean and free from any form of moisture before placing them in the oven.
- Meat: Meats can be turned into jerky through the dehydration process. Ensure that the meat is lean and well-trimmed of fat, which can spoil the end product.
- Jerky: Making jerky in the oven involves marinating thinly sliced meat and dehydrating it at low temperatures for several hours.
By following these steps, you can dehydrate a wide variety of foods, including strawberries, effectively at home in the oven. It’s a practical, cost-effective method of food preservation that can provide you with nutritious, home-dried snacks for months to come.
Tips for preparing food for dehydration

Preparing your food properly before dehydration is key to achieving the best results. Here are some essential tips:
- Slicing: Uniform slicing is crucial for even dehydration. Thin, consistent slices ensure that all pieces of food dry at the same rate.
- Pre-treatment: Pre-treatment methods like blanching, marinating, or using lemon juice can enhance the color and flavor of the food.
- Seasoning: Consider seasoning your food before dehydration. Spices, herbs, and salt can enhance the flavor of dehydrated food. For instance, a bit of cinnamon can enhance the flavor of dehydrated in the oven apple slices, while traditional jerky spices work well for meats.
Dehydrating process in the oven
If you’ve ever wondered how to dehydrate food without a dehydrator, the good news is that your oven can do the job. Here’s a step-by-step guide on how to use an oven to dehydrate:
- Preheating the oven: The first step is to preheat your oven. The temperature required for dehydration varies depending on the type of food you are dehydrating.
- Food placement: After you’ve prepared your food, arrange it on baking trays or racks. It’s essential to lay the pieces in a single layer and make sure they are not touching or overlapping.
- Dehydration time and temperature: The time it takes to dehydrate food in your oven depends largely on the type of food, its water content, and the temperature at which you are dehydrating it.
- Rotating and flipping: To ensure even drying, it’s important to rotate your trays and flip your food periodically. This might mean moving trays from the top rack to the bottom or rotating them 180 degrees.
- Checking for doneness: Checking your food’s doneness is a critical final step. Properly dehydrated food should be flexible and leathery for fruits, brittle for vegetables, and tough but still bendable for meats.
Remember that every oven is different and may have hot spots or uneven heat distribution, so your food may not all be ready simultaneously.

Storing dehydrated food
Proper storage of dehydrated food is essential to maintain its quality, nutritional value, and freshness. Here’s how to do it right:
- Cooling and conditioning: Once your food is dehydrated, allow it to cool completely at room temperature. This step is known as ‘conditioning’. It helps to distribute any remaining moisture evenly throughout the food, reducing the risk of mold growth during storage.
- Packaging: Pack the cooled, dehydrated food in airtight containers. This could be vacuum-sealed bags, zip-top bags, plastic containers, or glass jars.
- Storage conditions: Store your packaged dehydrated food in a cool, dark, and dry place. This could be a pantry, a basement, or a cupboard away from direct sunlight and heat sources.
- Check regularly: Regularly inspect your stored dehydrated food for any signs of moisture or spoilage. If detected early, you can re-dehydrate or consume the food before it spoils.
FAQ
How long does it take to dehydrate food in the oven?
On average, fruits and vegetables might take 6-12 hours, while meat for jerky might take up to 10 hours or more. Remember that every oven is unique, so these times are estimates. It’s important to check your food regularly throughout the dehydration process.
How do I know when the food is fully dehydrated?
Determining if your food is fully dehydrated depends on the type of food. For fruits, the slices should be pliable and leathery with no visible moisture. Vegetables should be brittle or crispy to the touch. Meat, when dehydrated properly, will be tough but still flexible. It’s important to let the food cool for a few minutes before checking, as it will become more firm once cooled.
Can I dehydrate different types of food together in the oven?
Yes, you can dehydrate different types of food together in the oven, provided they have similar drying times and temperatures. However, be aware that flavors can mix during the dehydration process.